Arduino

What is Arduino?

Arduino is an open-source prototyping platform based on easy-to-use hardware and software. Arduino boards are able to read inputs - light on a sensor, a finger on a button, or a Twitter message - and turn it into an output - activating a motor, turning on an LED, publishing something online. You can tell your board what to do by sending a set of instructions to the microcontroller on the board. To do so you use the Arduino programming language (based on Wiring), and the Arduino Software (IDE), based on Processing.
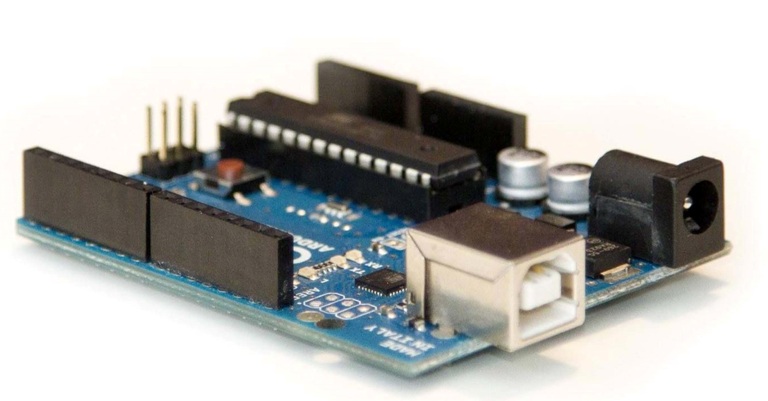
Over the years Arduino has been the brain of thousands of projects, from everyday objects to complex scientific instruments. A worldwide community of makers - students, hobbyists, artists, programmers, and professionals - has gathered around this open-source platform, their contributions have added up to an incredible amount of accessible knowledge that can be of great help to novices and experts alike.

Arduino was born at the Ivrea Interaction Design Institute as an easy tool for fast prototyping, aimed at students without a background in electronics and programming. As soon as it reached a wider community, the Arduino board started changing to adapt to new needs and challenges, differentiating its offer from simple 8-bit boards to products for IoT applications, wearable, 3D printing, and embedded environments. All Arduino boards are completely open-source, empowering users to build them independently and eventually adapt them to their particular needs. The software, too, is open-source, and it is growing through the contributions of users worldwide.

Why Arduino?

Thanks to its simple and accessible user experience, Arduino has been used in thousands of different projects and applications. The Arduino software is easy-to-use for beginners, yet flexible enough for advanced users. It runs on Mac, Windows, and Linux. Teachers and students use it to build low cost scientific instruments, to prove chemistry and physics principles, or to get started with programming and robotics. Designers and architects build interactive prototypes, musicians and artists use it for installations and to experiment with new musical instruments. Makers, of course, use it to build many of the projects exhibited at the Maker Faire, for example. Arduino is a key tool to learn new things. Anyone - children, hobbyists, artists, programmers - can start tinkering just following the step by step instructions of a kit, or sharing ideas online with other members of the Arduino community.

There are many other microcontrollers and microcontroller platforms available for physical computing. Parallax Basic Stamp, Netmedia's BX-24, Phidgets, MIT's Handyboard, and many others offer similar functionality. All of these tools take the messy details of microcontroller programming and wrap it up in an easy-to-use package. Arduino also simplifies the process of working with microcontrollers, but it offers some advantage for teachers, students, and interested amateurs over other systems:


- Inexpensive - Arduino boards are relatively inexpensive compared to other microcontroller platforms. The least expensive version of the Arduino module can be assembled by hand, and even the pre-assembled Arduino modules cost less than $50

- Cross-platform - The Arduino Software (IDE) runs on Windows, Macintosh OSX, and Linux operating systems. Most microcontroller systems are limited to Windows.

Simple, clear programming environment - The Arduino Software (IDE) is easy-to-use for beginners, yet flexible enough for advanced users to take advantage of as well. For teachers, it's conveniently based on the Processing programming environment, so students learning to program in that environment will be familiar with how the Arduino IDE works.

- Open source and extensible software - The Arduino software is published as open source tools, available for extension by experienced programmers. The language can be expanded through C++ libraries, and people wanting to understand the technical details can make the leap from Arduino to the AVR C programming language on which it's based. Similarly, you can add AVR-C code directly into your Arduino programs if you want to.

- Open source and extensible hardware - The plans of the Arduino boards are published under a Creative Commons license, so experienced circuit designers can make their own version of the module, extending it and improving it. Even relatively inexperienced users can build the breadboard version of the module in order to understand how it works and save money.


Condividi

Approfondimenti

Writing Example Code

Efficiency is not paramount; readability is.

The most important users of Arduino are beginners and people who don't care about code, but about getting projects done.

Think generously about people who know less than you about code. Don't think they should understand some technical concept. They don't, and they're not stupid for not understanding. Your code should explain itself, or use comments to do the same. If it needs a complex concept like registers or interrupts or pointers, either explain it or skip it.

When forced to choose between technically simple and technically efficient, choose the former.

Introduce concepts only when they are useful and try to minimize the number of new concepts you introduce in each example. For example, at the very beginning, you can explain simple functions with no variable types other than int, nor for consts to define pin numbers. On the other hand, in an intermediate example, you might want to introduce peripheral concepts as they become useful. Concepts like using const ints to define pin numbers, choosing bytes over ints when you don't need more than 0 - 255, etc. are useful, but not central to getting started. So use them sparingly, and explain them when they're new to your lesson plan.

Put your setup() and your loop() at the beginning of the program. They help beginners to get an overview of the program, since all other functions are called from those two.

Commenting Your Code

Comment every variable or constant declaration with a description of what the variable does.

Comment every code block. Do it before the block if possible, so the reader knows what's coming

Comment every for loop

Use verbose if statements. For simplicity to the beginning reader, use the block format for everything, i.e. avoid this:

if (somethingIsTrue) doSomething;


Instead, use this:

if (somethingIsTrue == TRUE) {

   doSomething;

}


Avoid pointers

Avoid #defines

Variables

Avoid single letter variable names. Make them descriptive

Avoid variable names like val or pin. Be more descriptive, like buttonState or switchPin

If you want to define pin names and other quantities which won't change, use const ints. They're less messy than #defines, yet still give you a way to teach the difference between a variable and a constant.

Use the wiring/Processing-style variable types, e.g. boolean,char,byte,int,unsigned int,long,unsigned long,float,double,string,array,void when possible, rather than uint8_t, etc. The former are explained in the documentation, and less terse names.

Avoid numbering schemes that confuse the user, e.g.:

pin1 = 2

pin2 = 3

etc.


If you need to renumber pins, consider using an array, like this:

int myPins[] = { 2, 7, 6, 5, 4, 3 };


This allows you to refer to the new pin numbers using the array elements, like this:

  digitalWrite(myPins[1], HIGH);  // turns on pin 7


It also allows you to turn all the pins on or off in the sequence you want, like this:

for (int thisPin = 0; thisPin < 6; thisPin++) {

   digitalWrite(myPins[thisPin], HIGH);

   delay(500);

   digitalWrite(myPins[thisPin], LOW);

   delay(500);

}


Explain the code at the start

Here's a good title block:


/*

            Sketch title


            Describe what it does in layman's terms.  Refer to the components

            attached to the various pins.


            The circuit:

            * list the components attached to each input

            * list the components attached to each output


            Created day month year

            By author's name

            Modified day month year

            By author's name


            http://url/of/online/tutorial.cc


*/


Circuits

For digital input switches, the default is to use a pulldown resistor on the switch rather than a pullup. That way, the logic of a switch's interaction makes sense to the non-engineer.

Keep your circuits simple. For example, bypass capacitors are handy, but most simple inputs will work without them. If a component is incidental, explain it later. 

Vedi tutto
PS
pscattoni 9 Anni Fa
Ho partecipato in qualità di osservatore alla prima sessione del modulo di Arduino. Molto interessante e molto partecipata. Troverei assai utile che alla fine del percorso si arrivasese a due prodotti:
1) La stesura di una specie di diario del laboratorio nel suo svolgersi. Questo riguarda Arduino come tutti gli altri moduli.
2) La stesura di una guida di base di non più di 50 pagine dove vengono descritte tutte le operazioni necessarie. Per il corso di base è opinione corrente che bastano 10 ore per apprendere le nozioni necessarie a gestire il microcontrollore. Tutte le guide a disposizione sono anora troppo dispersive. Sarebbe bene, utilizzando l'esperienza del laboratorio, scrivere un "bignami" di introduzione ad Arduino.
12
TA
aritonteodor 9 Anni Fa
Buonasera!
Avrei bisogno di un aiuto per quanto riguarda Arduino Uno.
Ho creato uno sketch per far funzionare un motore STEPPER, l'ho collegato ed il programma funziona, l'unico problema è che il motore stepper funziona con 20V e non so come collegare un'alimentatore da 20V ad Arduino senza danneggiarlo.
12
PS
pscattoni 9 Anni Fa
Ho diffuso la richiesta di Teodor anche sulla mail list del progetto. Qulache suggerimento utile?
12
GB
giovanna 8 Anni Fa
Buongiorno,
sono da sempre interessata alle nuove tecnologie e le loro applicazioni in nuovi settori. Ho scaricato e letto con vero piacere i due instant book, contengono molte informazioni e forniscono una serie di spunti. Condividerò con i miei colleghi quanto viene trattato nei diversi laboratori.
12
PS
pscattoni 8 Anni Fa
Gentile Giovanna Bacci, la fase del progetto di scienza di cittadinanza finanziato dall'Autorità per la Garanzia e Promozione della Partecipazione è ormai in chiusura. Si è aperta una seconda fase, quella che deve fare affidamento esclusivo sulle proprie forze. L'associazione Innovazione Locale ha organizzato in collaborazione con l'IIS Valdichiana un corso introduttivo al microcontrollore Arduino che riprendendo l'impostazione di Laboratorio Ambiente ha cercato di svilupparlo con il metodo dell'insegnamento capovolto. Sono stati così preparati semplici video che i partecipanti visionano prima e poi si utilizza il tempo in aula per lavorare sull'argomento in piccoli gruppi. Sabato il corso si conclude con una esercitazione sui progetti possibili. Può vedere il video sul blog dell'associazione innovazione locale:
https://innovazionelocale.wordpress.com/2015/11/03/ultima-lezione/#respond
Ora abbiamo un piccolo capitale sicuramente da migliorare, ma anche riutilizzabile in eventuali repliche del corso. Non so dove lei abiti, comunque se vuole partecipare al nostro ultimo appuntamento alle 14.15 di sabato sarà sicuramente benvenuta.
12
LF
leone 8 Anni Fa
Buon pomeriggio, durante il laboratorio dei droni verranno realizzati e inseriti video?
Grazie!
01
labam 8 Anni Fa
Ciao Leone,

Sì, verranno realizzati brevi video sia durante le sessioni di laboratorio dedicate alla fase di realizzazione dei droni che nel loro impiego operativo. I video saranno caricati sul canale Youtube del progetto ed inseriti qui su questa piattaforma per essere commentati e condivisi.
01
PS
pscattoni 8 Anni Fa
Scrivo contemporaneamente a diverse liste. Mi scuso con coloro ai quali arriverà lo stesso messaggio.
Pochi giorni fa l'Autorità per la partecipazione della Toscana ha approvato il rapporto conclusivo del progetto Laboratorio Ambiente che aveva finanziato con 16.000 euro. Quel progetto è stato sicuramente un successo da molti punti di vista. Quel rapporto con un po' di sforzo potrebbe diventare un libretto di qualche decina di pagine a cura della scuola per offrire qualche suggerimento a chi volesse ripeterlo.
Anche la stanza del progetto aperta sul sito Open Toscana (http://open.toscana.it/web/laboratorio-ambiente/home) ha avuto il più alto numero di visite fra i progetti finanziati ed è vicino a quelli gestiti direttamente dalla Regione (pendolari, open data,ecc.) che però possono contare su ben altri mezzi.  Il lavoro in questo senso di Fosco Taccini è stato davvero importante. Sebbene in italiano ci sono stati contatti anche dall'estero.
Nei due laboratori su Arduino (il primo finanziato e il secondo svolto a costo praticamente zero) ci siamo lasciati con l'intenzione di costruire una "community" da animare soprattutto via web. La community dovrebbe servire a mantenere i contatti e a informarci e aiutarci a vicenda nella realizzazione dei progetti in corso e quelli futuri.
Quella promessa non è stata ancora mantenuta. Due sono le difficoltà. la prima è la scelta del "luogo" web dove incontrarsi: un blog, un forum, che altro? Il problema è comunque facilmente risolvibile.
Il secondo problema invece richiede una riflessione in più: la voglia di scrivere. Nella mia frequentazione della scuola ho potuto constatare che quasi tutti gli studenti hanno paura di scrivere. Ho conosciuto alcune belle intelligenze che preferiscono una coltellata alla richiesta di scrivere cinque righe cinque. Questo nonostante la qualità dei loro docenti di italiano.
Non so da cosa dipenda. È un problema di tipo di intelligenza; quella pratica che permette loro di immaginare e poi realizzare oggetti complessi di fronte all'obbligo di mettere in sequenza informazioni e concetti si arrende? Non lo so. So soltanto che rinunciare alla scrittura nell'epoca del web è un grave handicap che li danneggia. Di sicuro non consente di costruire la community. Eppure ci sono strumenti che permetterebbero loro di smanettare un po' anche nella costruzione di un breve testo.
Allora la mia proposta è la seguente: costruire un breve corso (max 6 ore) finalizzato alla costruzione della nostra community di maker. Il metodo dovrebbe essere quello che abbiamo utilizzato nell'ultimo corso di Arduino: la classe capovolta. Si preparano alcuni video da vedersi prima della lezione e utilizzare il tempo in aula per esercitazioni al computer in piccoli gruppi.
La faccio troppo lunga se c'è qualcuno interessato faccia sapere su queste liste oppure mi contatti direttamente.
01
PS
pscattoni 8 Anni Fa
Questo sito sta per essere aggiornato perché le applicazioni stanno maturando. L'endoscopio per gli archeologi sta diventando una realtà. Spero che Teodor Ariton ce lo possa presentare molto presto. Alcuni si stanno misurando con la costruzione di stampanti di oggetti tridimensionali. Qualcuno si misura su una stampante 3d da assemblare con pezzi che costano meno di 250 euro. Ci sono poi i droni da realizzare con pezzi acquistati con gli ultimi residui del finanziamento regionale.
01
PS
pscattoni 8 Anni Fa
Su chiusiblog.it un interessante articolo di Corrado Giancaspro per un progetto di LIM a basso costo (http://www.chiusiblog.it/?p=31322) che potrà rafforzare non poco le attività di Laboratorio Ambiente.
01
PS
pscattoni 8 Anni Fa
Mi dicono grandi cose del drone in costruzione. È possibile avere qualche anticipazione?
01
PS
pscattoni 8 Anni Fa
Recente ho avuto modo di conoscere l'HackLab di Terni (http://hacklabterni.org/). È ospitato nel museo CAOS. Vale la pena esplorare il loro sito web perché potrebbe ispirare attività di Laboratorio Ambiente.
00
carlo.giulietti 7 Anni Fa
Buongiorno Paolo, il laboratorio riguardante i droni è iniziato mercoledì 20 aprile: dopo alcune sessioni introduttive, sono iniziate le sessioni di sperimentazione e applicazione. La sessione di mercoledì ha approfondito la verifica dell'assetto e del corretto funzionamento del velivolo nelle sue parti meccaniche ed elettroniche.
01
PS
pscattoni 6 Anni Fa
Su laboratorioambiente.it viene via via pubblicata la documentazione del nuovo corso Arduino 2017.
00